Pages

Saturday, July 27, 2013

Chicken Sofrito

Of the three lovely ladies with whom I share dinner night, two others have a birthday in July, one – Architect – earlier in July and one – Foodie – later in July, the day after me.  We celebrated Architect’s birthday earlier in July and the menu included these little jewels: 

Eggs poached in peppers on the grill…easy and so damn stinking good.

Anyway, we knew Architect received the Jerusalem cookbook for her birthday.

Now we all have a copy.

She agreed to host the late-July birthday celebration.

She said she wanted to make something special.

We were all waiting in mouth-watering anticipation!

Yep, she made a dish from the Jerusalem Cookbook, Chicken Sofrito.

The cookbook explains that “sofrito” is actually more of cooking method than a name of a dish and is “a perfect example of how frugality yields some superb delicacies and it is tremendously popular in Jerusalem.” Many inhabitants of the city are comfortable financially but just as many are struggling and this cooking method “reflects the scarcity and costliness of many ingredients.”  The word sofrito comes from the Spanish verb sofeir (to fry lightly) and the frying the chicken is the starting point for this method of cooking that culminates in a wonderful, slow-cooked braise that encourages the meat to just fall off the bone while eating….I am a witness to that effect! 

Architect prepared this dish in a beautiful 8 quart Cuisinart Dutch oven.  With a pan that big you can lay the whole chicken flat by butterflying it through the center of the breast…a butcher can do this for you too.

Chicken Sofrito
From:   Jerusalem Cookbook

1 tablespoon sunflower oil
1 small free-range chicken, butterflied or quartered
1 teaspoon sweet paprika
¼ teaspoon ground turmeric
¼ teaspoon sugar
2 ½ tablespoons of freshly squeezed lemon juice
1 large onion, peeled and quartered
Sunflower oil for frying
1 ¾ pounds Yukon Gold potatoes, peeled, washed and cut into ¾” cubes
25 cloves of garlic, unpeeled
Salt and freshly ground pepper.

Pour the oil into a large, shallow pan or Dutch oven and place over medium heat.  Place the chicken flat in the pan, skin side down, and sear for 4-5 minutes, until golden brown.  Season all over with paprika, turmeric, sugar, scant ¼ teaspoon salt, a good grind of black pepper, and 1 ½ tablespoons of the lemon juice.  Turn the chicken over so that the skin faces up, add the onion to the pan, and cover with a lid. 

Decrease the heat to low and cook for a total of 1 ½ hours; this includes the time the chicken is cooked with the potatoes.  Lift the lid every now and then to check the amount of liquid in the bottom of the pan.  The idea is for the chicken to cook and steam in its own juices, but you may need to add a little bit of boiling water, just so there is always 1/4”  of liquid at the bottom of the pan.

After the chicken has been cooking for about 30 minutes, pour sunflower oil into a medium saucepan to a depth of 1 ¼” and place over medium-high heat.  Fry the potatoes and garlic together in a few batches for about 6 minutes per batch, until they take on some color and crisp up.  Use a slotted spoon to lift each batch away from the oil and onto paper towels, then sprinkle with salt.

After the chicken has been cooking for 1 hour, lift it from the pan and spoon in the fried potatoes and garlic, stirring them with the cooking juices.  Return the chicken to the pan, placing it on top of the potatoes for the remainder of the cooking time, 30 more minutes.  The chicken should be falling off the bone and the potatoes should be soaked in the cooking liquid.  Drizzle with lemon juice and serve. 

As our birthday cake, we had a fruit tart, then we exchanged gifts...a picture, perfect celebration.  We are so lucky to be able to enjoy this dinner club with each other.

Saturday, July 13, 2013

Homemade Barbecue Sauce


So I wanted to make pulled chicken with the chicken I had in the freezer and I was certain I had a bottle of barbecue sauce in the cupboard.

Maybe not.

I don’t like when that happens.

So, really, REALLY not wanting to make a special trip to the market, I decided to make my own barbeque sauce…how hard could it be?!  A simple search for “homemade barbecue cause” returned several entries and I cobbled together the formula you see below from recipes for Kansas City and St. Louis Barbecue Sauces. The sauce I concocted is a thinner, tangier sauce, perfect for pulled chicken or pork.  

I Don’t Have Any Barbecue Sauce in the Cupboard Barbeque Sauce

Ingredients
2 cups ketchup
½ cup water
1/3 cup apple cider vinegar
¼ cup brown sugar (make this a generous ¼ cup)
2 tablespoons spicy mustard
1 tablespoon onion powder
1 tablespoon fresh garlic
½ teaspoon cayenne powder
½ teaspoon chili power
A nice squirt of honey

Preparation
Combine all ingredients in a saucepan and cook over a low heat. Simmer for 20 minutes, giving it an occasional stir. Allow to cool. Store in an airtight container and refrigerate. This sauce is better after it sits for a day and should be used within a week.

For pulled chicken or pork, use boneless chicken breasts or a pork tenderloin. Throw in some diced up onions, peppers and tomatoes, if desired.  Simmer the meat for a few hours in just enough sauce to cover however much meat you are making.  When the meat is fully cooked and just about to fall apart, shred the meat with two forks. Serve on a bun with a slice of cheddar cheese. YUM.

This has a zip to it!  Great on grilled chicken.

Thursday, July 4, 2013

Trash Pickers: Swarthmore 4th of July Edition

A few weeks ago, younger daughter says to me… “Mom, I need a narrow bookcase to fit next to my desk to hold my printer, books and some other things.”

She’s creating vertical storage (my sister taught me the concept of "vertical storage") because, if you recall, she drew the last straw and occupies the smallest room in her house on University of Delaware’s campus that she shares with three other girls. I tell her that we can probably find something pretty reasonably priced at that big Swedish superstore with the yellow and blue logo.

We were planning a trip. 

Then I went for a run.

During my last quarter mile, I see a large object lying on the ground ahead at the curb.  In these parts, that usually means that someone has discarded a perfectly functional furniture item of some sort.  It amazes me the shit stuff that people discard.
 
 Upon closer inspection, it was this narrow bookcase! 

I was downright gleeful.

It is in perfect condition, although quite dull and dreary.  Without further delay, I hightailed it home (I forgot to stretch after my run and I’m going to pay for that later) and dart into the house to tell younger daughter to skedaddle over to scene of the sighting to see if she was interested.  She was and we promptly loaded the bookcase into her car and then drove straight to Home Depot.

I have mentioned on several occasions how much I love Home Depot...one day, maybe I’ll apply for a job.

Anyway, younger daughter decides she wants to paint her newly trash-picked treasure a nice shade of blue and she chooses a lovely Behr color called “Ocean Boulevard,” number PPU13-10.  We purchase the paint and a few implements and we head home to begin the transformation. 
 
I love DIY projects....especially when it's saving me money.

Halfway through, younger daughter says, “hey mom, do you have any of the paint left you used to paint that red cabinet….I’d like to add a pop of color.”  I locate the red paint and we continue on with our little 4th of July project.

 
And here is the finished work of art…my friend Linda would be pleased.  Younger daughter’s friend Maddie would be proud of her trash-picking prowess.  My wallet is very thankful.  It's downright drab-to-fab gorgeous, unique....and functional.  We still have to drill a hole in the back for her printer wires.

So, for the cost of a quart of paint -- $12.58 – and my sore hamstrings because I forgot to stretch after my run, younger daughter has a beautiful new, custom bookcase….certainly better than the cooker-cutter option!  I knew there was a good reason I began to run around the 'hood.

UPDATE:  Here's our masterpiece in younger daughter's room...in the perfect place, nice and snug as a bug, just as she imagined.  Notice the fancy dresser in the lower right hand corner...you can read about that here. Don't you just love when things work out!?

Sunday, June 23, 2013

1-2-3-4 Lime Rhubarb Cake

Foodie hosted a wonderful dinner party to celebrate Mr. Foodie’s birthday. 

The table was beautifully set.
 
There were white lights in the trees and festive paper lanterns. 
 
We had the most succulent oysters for appetizers and, as the main course...
 
...the tenderest slow-roasted (two hours at 200°) filet of beef.
 
 Everything was just perfect but the pièce de résistance of the night...
 
... was most certainly the birthday cake that Foodie made.

Foodie’s birthday masterpiece was adapted from Martha Stewart’s 1-2-3-4 Lemon Cake recipe….and as we all know, I adore Martha.   Martha explains that “the name of this old-fashioned cake comes from the simple formula used for measuring the main ingredients: one cup butter, two cups sugar, three cups flour, and four eggs.”

Instead of the lemon curd the original recipe calls for, Foodie made a lime-rhubarb curd adapted from Tartine’s lemon curd recipe. Tartine is a bakery located in San Francisco’s Mission District.  Apparently there is a cookbook featuring the bakery’s coveted confections.  I feel an impending iPad download.

The ingredients in this cake might be 1-2-3-4 simple, but this cake is 10-star tasty!

1-2-3-4 Lime Rhubarb Cake
Adapted from Martha Stewart Living, May 1997

1 cup (2 sticks) unsalted butter, room temperature, plus more for pans
3 cups sifted all-purpose flour, plus more for pans
1 tablespoon baking powder
1 teaspoon baking soda
1/2 teaspoon salt
2 cups granulated sugar
4 large eggs, lightly beaten
1 1/4 cups buttermilk
Grated zest of two limes
1 1/2 teaspoons pure vanilla extract
3 cups Lime-Rhubarb curd (see recipe below)
Your favorite cream cheese rrosting
12 ounces assorted fresh berries

Heat oven to 350 degrees. Arrange two racks in center of oven. Butter two 8-by-2-inch round cake pans; line bottoms with parchment paper. Dust bottoms and sides of pans with flour; tap out any excess.

In a large bowl, sift together flour, baking powder, baking soda, and salt.
 
In the bowl of an electric mixer fitted with the paddle attachment, cream butter on medium speed until softened, 1 to 2 minutes. Gradually add granulated sugar, beating on medium speed until lightened, 3 to 4 minutes; scrape down sides once or twice. Drizzle in eggs, a little at a time, beating after each addition until batter is no longer slick, about 5 minutes; stop once or twice to scrape down sides.

On low speed, alternately add flour mixture and buttermilk, a little of each at a time, beginning and ending with flour mixture. Beat in lime zest and vanilla.

Divide batter evenly between the prepared pans. Bake 25 minutes, then rotate the pans in the oven for even browning. Continue baking until a cake tester inserted into the center of each cake comes out clean, 10 to 20 minutes more. Transfer pans to wire racks to cool, 15 minutes. Turn out cakes; set on racks, tops up, until completely cool.

Remove the parchment from bottom of each cake. Using a serrated knife, slice each layer in half horizontally. Set aside the prettiest domed layer for the top of cake. Place another domed layer, dome-side down, on a serving platter. Spread 1 cup curd over surface to within 1/2 inch from edges. Place second cake layer over the first, and spread another 1 cup curd over top. Repeat with third cake layer and remaining cup curd.

Ice the cake with your favorite cream cheese frosting.  Serve with mixed berries.

Lime- Rhubarb Curd
Adapted from Tartine’s Lemon Curd recipe

1 to 1 ½ cups of rhubarb
1/2 cup lime juice
3 large eggs
1 large egg yolk
3/4 cup sugar
Pinch of salt
1 cup unsalted butter

Chop rhubarb into 1-inch pieces and place in a small saucepan with enough water to cover the fruit. Bring to a boil and simmer for about 20 minutes until rhubarb is soft and you have a nice pink juice. Puree and strain through a sieve and let cool.

Pour about 2 inches of water into a saucepan, place over medium heat, and bring to a simmer.  Combine lime juice, whole eggs, yolk, sugar and salt in a stainless steel bowl on top of a double boiler. Whisk ingredients constantly for 10-12 minutes until the mixture becomes very thick and registers 180°F on a thermometer.   Take the bowl from over the water and stir from time to time to release the heat. Meanwhile, cut butter into 1 tbsp-pieces. When the cream is cool, using either a regular blender, or an immersion blender, add 1 piece of butter at a time to lime mixture, blending after each addition of butter. Blend in the pureed rhubarb.  The cream will be a pale, pretty opaque pinkish color, and quite thick.

Sunday, June 16, 2013

The Fancy Dresser

As I explained before in this post, my house is a hodge-podge of nothing really matches but everything goes.  Some with a more traditional style may describe my decorating approach as interesting; I prefer to think of it as seemingly disparate things blending together harmoniously. Neither shabby chic or kitschy, just colorful and a bit unusual.  Both daughters seem to have inherited my ability to selectively embellish…I hope that’s a good thing.

As an example, younger daughter moved into a house at the University of Delaware.  She is a rising junior and I understand that moving off-campus is typically what juniors and seniors do.  I was a commuter student, so I don’t know about these things.  Anyway, she needed a dresser for her room and the dressers in the room she inhabited while she lived at home are built-ins so they would be difficult to move.  Not wanting to break the bank on a cookie-cutter piece of furniture, I turned to my friend Linda at FuNkY FuRniTuRe. Linda’s motto is “Paint it Happy.”  She turns tired tables into treasures and battered bureaus into beautys.  Every piece is unique.

So, here is the piece before Linda went to work with her magic paintbrush.  As you can see, this chest of drawers is a tired old girl.  It is still perfectly functional and, since it’s a deco piece from the 1940’s, it has good bones.  

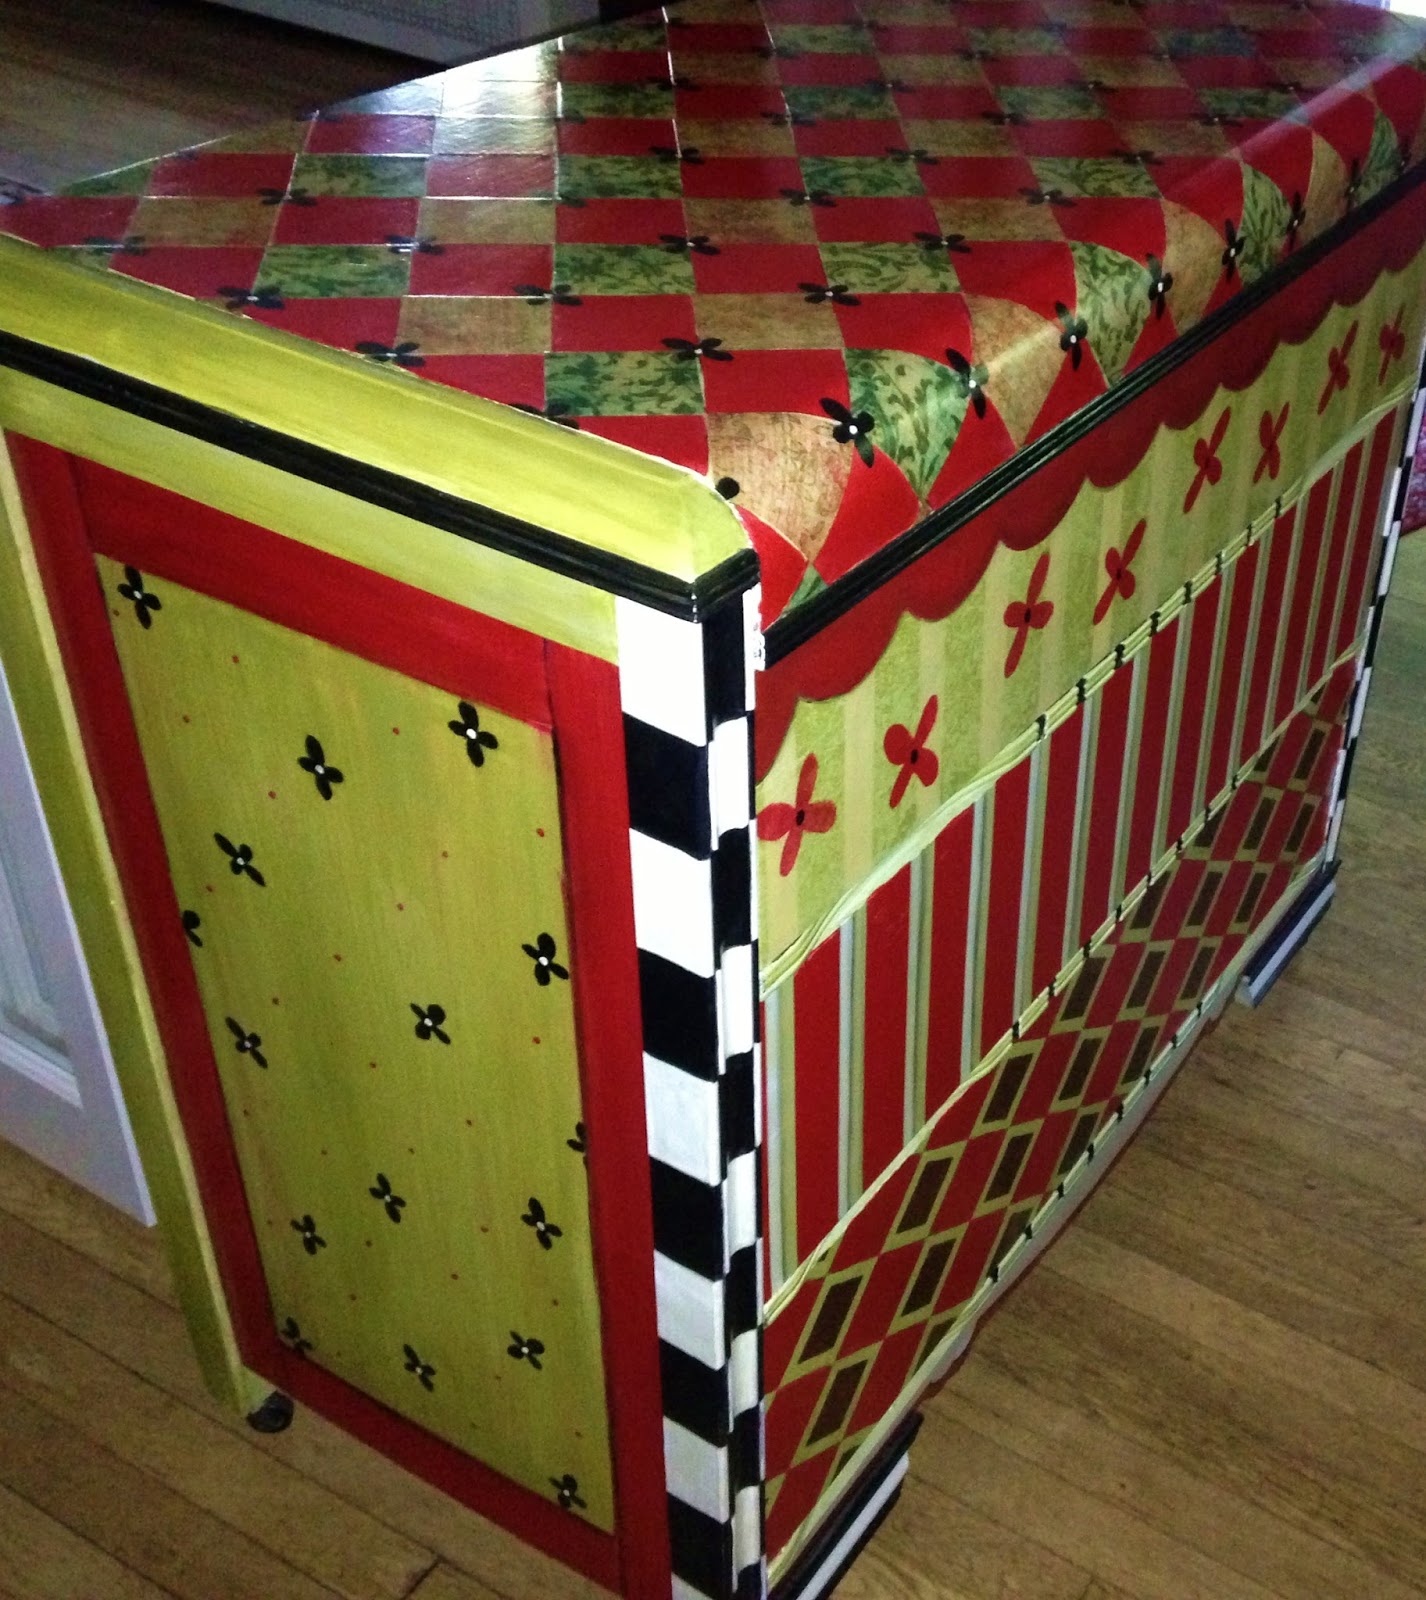
Now this is the after piece!  Isn’t she gorgeous!? 

The first thing I noticed – because I notice these things – is that there are no drawer pulls and that’s because there are little carve-outs underneath each drawer to pull from.

I wish I could say that I had a favorite aspect of this piece, but I don’t, I love the entire work of art…

…the harlequin pattern and the scallops…

 
…the fun treatment on the top which is craft paper and modge podge…

...the way fanciful little flowers dance around the entire piece framed by a whimsical checkerboard pattern.

This is only a sampling of Linda’s talents.  If you want to see more,  you can visit her facebook page at FuNkY FuRniTuRe and LIKE it to receive updates on her artsy antics!