Pages

Monday, May 30, 2011

Happy Memorial Day!

Happy Memorial Day dear readers!

The day was originally called Decoration Day because it was the day set aside to place flags and flowers on the graves of those who served our country. However, Memorial Day was officially proclaimed a holiday in May 1868 and at first, the day only commemorated Union and Confederate soldiers who died during the Civil War. By 1890, Congress proclaimed that the last Monday in May would honor all Americans who died fighting in any war.

The photo is of my father who was a WWII veteran. He returned safely from Europe, but many of his buddies, did not. Many others have not returned from subsequent conflicts and for their sacrifice, we are a grateful nation. If you see a soldier today, don't forget to say thank you!

I hope you all have a wonderful and safe summer...I'm looking forward to it!

Saturday, May 28, 2011

Lemon Drop Martini

I just returned from a conference in Orlando. Every year about this time, I attend the same professional conference (remember Boston last year?) and I usually try to pepper my visit with some sightseeing…well, no such peppering this year. I’m really not much of a Disney person (but totally understand and appreciate the allure for others). I did watch the fireworks from my hotel balcony…I also had a lovely view of the air conditioning system and the parking lot.

Maybe I should have upgraded to a pool view for $30 a night.

I rarely go anywhere without my camera…until now. I forgot my camera and, therefore, am not able to share photos of the week…what kind of blogger forgets her camera?

Apparently me.

Let me explain the temporary lapse in my otherwise fairly organized approach to traveling. As you know from a previous post, I am a big “To-Do” list person….if it doesn’t get written down, it doesn’t happen.

Anyway, I was scheduled to speak at this particular conference and I was frenzied busy preparing for the same and remembering the things necessary to present – like my wireless clicker and laptop. Consequently, some routine check-list personal items – i.e.camera – got left behind…I did remember some other fairly significant items, but you don’t need to hear about those.

BTW, my presentation was on Behavioral Interviewing…fascinating stuff.

Despite my inability to photo-document my (scant) escapades, I had several days of learning and networking with industry peers including a wonderful dinner at a martini bar where I enjoyed a Lemon Drop Martini. What a perfect topic for a post, thought she.

Lemon Drop Martini
From: johnniemartini.com

Ingredients
1 1/2 shots of vodka – I like Grey Goose
1/2 shot triple sec
1 teaspoon confectioners sugar
1 shot of freshly squeezed lemon juice – about the juice of one medium lemon
Granulated sugar for the rim of the martini glass

Mixing The Lemon Drop Martini
Pour the vodka, triple sec, sugar and lemon juice into an ice-filled shaker. I used the new doggie shaker I got for Mother’s Day. Shake sufficiently to fully dissolve the sugar.

To serve your Lemon Drop Martini, choose a clear martini glass, glaze the rim with juice from a slice of lemon and dip the rim in granulated sugar, pour the martini and garnish with a slice of lemon.

Beware...these go down easy! You've been warned.

Friday, May 20, 2011

Doggie Biscuits

My Boston Terrier, Stella, turned eleven this week. Birthdays are a big deal in my house and having a doggie birthday is an equally good reason to celebrate. Obviously, dogs can’t have a normal birthday cake, but they can have and LOVE tasty home-made doggie biscuits and that’s exactly what I made for my loyal canine companion.

First of all, Martha came through – AGAIN! I went searching for dog-bone cookie cutters and the sweet little cashier at PetSmart said “I have just what you’re looking for” and brought me to a whole display of Martha Stewart doggie paraphernalia. I was able to purchase doggie bone cookie cutters in three convenient sizes…in case I ever get a bigger dog (Stella is only 15 lbs.). They came with a recipe, but I opted to use a recipe I found on Bullwinkle.com.

Peanut Butter Biscuits


2 cups whole wheat flour
1tbsp baking powder
1 cup of peanut butter
1 cup of milk

Preheat oven to 375°. In a bowl, combine flour and baking powder. In another bowl, mix peanut butter and milk with an electric mixer until smooth, then add to the dry ingredients and mix well. Place dough on a lightly floured surface and knead for about one minute.

Roll dough to ¼ inch thickness and use a cookie cutter to cut into shapes. Bake for 18-20 minutes or until lightly brown.

Cool on a rack.

Store in an air-tight (special birthday) container. Makes about 24 doggie biscuits.

I tried one…they’re arf-ly good.

Happy Birthday Stella!

Wednesday, May 18, 2011

The Cook in the Kitchen with a Bag of Peanut Butter Cups

A little game of Clue.

What, you ask, could she possibly be making with Reese's Peanut Butter Cups, Ghirardelli Chocolate Squares and shoe string licorce? Stay stuned!

The mystery - complete with photos - will be revealed the first week of June...any guesses?

Such suspense.

Sunday, May 15, 2011

The Wheelbarrow

This is a long post…be patient.

Ok…I have a relatively big yard and I don’t own a wheelbarrow so I decided to buy one this past Saturday. Not only will it serve the obvious purpose, I also plan to fill it with ice and beverages for an upcoming graduation party for youngest daughter. I own a Mini Cooper…but it’s the larger barn-door back model, quite cute, cream with a black sun-roofed top. It didn’t occur to me that the wheel barrow would not fit into the Mini to transport… a detail – until I tried to get it into the car. Did I mention I am spatially challenged?

Now, I love Home Depot. I own the house that Home Depot built. Not really, but I get a lot of stuff there, including my new kitchen. The Garden Center however, just dropped a few pegs in my Home Depot blissful estimation. Here’s the exchange following the purchase of a very nice, orange steel wheelbarrow:


Me: “Hi, I just bought a wheelbarrow and I need to take the wheel off to get it into my car. Do you have a wrench I could borrow? ” (Note I did not ask for anyone to perform any labor other than to hand me a tool.)

Cashier Guy: “Do you mean a screwdriver?” (Now feeling confident that tools could be produced…that was over-ambitious of me.)

A slightly annoyed Me (because even though I am a girl, I do know what tool to use most of the time): “No, I need to loosen a nut and bolt so I need a wrench” (He probably thought he was talking to the only nut in the general vicinity.)

I'm too busy Cashier Guy: “No, we don’t have any tools (really?!), you would need to go to the Customer Service desk.” (Note that it was 8:25 in the morning and Home Depot was relatively empty and there were two cashiers on duty).

A more annoyed Me: “Well, I have a wheel barrow hanging out of my car…it will take me two minutes if you have a wrench.”

Not-my-problem Cashier Guy:
“Shrugs.” Is there an emoticon for a shrug? Maybe… o{

A fairly pissed off Me: “Okay then, I will deal with this myself.” Still no attempt to assist…oh that’s right…I was in the “Garden Center” not “Customer Service.” Silly girl.

So I collect the half in/half out wheel barrow from my car (it’s a nice wheel barrow and I did want it to roll away) and mosey into the Customer Service desk.

Home Depot will now reclaim the pegs they dropped.

The very nice Customer Service guy sent the Wheelbarrow rolling to “Tool Rental” who would remove the wheel. Once the operation was complete, Customer Service informed me that I could drive to the “Contractor Entrance” to collect my orange albatross. Remember I said it was 8:25 in the morning? I just returned from a run before hopping into the car for a QUICK trip to Home Depot, so I did not look my most glamorous and was mortified that I had to interact with yet another Home Depot department.

I put lip gloss on hoping it would help.

The wheel was removed and the nice lady at the Tool Rental desk asked me if I needed “help” and for some BIZARRE reason I said “No, thank you” and proceeded to CARRY (yes, I said CARRY) the wheel-less wheelbarrow to my car. I deserved that for being so stubborn (and stupid).

Now for the really exciting part.

Another customer, a very nice gentleman, who witnessed my snooty tool-rental-lady episode took pity on me (or was it control of me) and asked if he could help.

Maybe it was the lip gloss.

Despite my “No, thank you, I’ll be fine” declaration and protestation of help, he said, (and I quote) “be quiet, I will help you.” I did what I was told and shut up. He put the wheelbarrow in my car (it still didn’t quite fit), tied the barn-style doors together with twine (they have a twine kiosk at Home Depot) and said, “that ain’t going no where…just drive slow.” I broke my vow of silence and said “thank you very much, that was very kind of you.” I wonder if he’s single…even if his grammar isn’t perfect. The lesson dear readers…sometimes even fiercely independent, self-sufficient and less-than-perfect girls need to graciously accept help when offered.


Anyway, the wheelbarrow is now home with its wheel attached and ready for dual service. I’m glad I didn’t make an empty I-won’t-shop-here-anymore promise that I know I won’t keep. Besides, maybe I'll see the wheelbarrow knight again.

Friday, May 13, 2011

Cup O' Joe

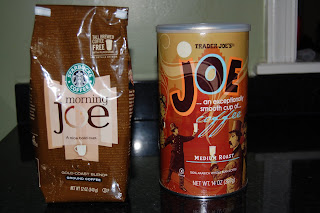
I love a good cup of coffee and this traditional liquid stimulant has several American nicknames…hi-test, mud, Java and my personal favorite, Joe (especially since it seems like everyone in my family is named Joe). Even Starbucks and Traders Joe’s have jumped on board with their brand blends….Morning Joe and Joe.

I’ve always wondered where the nickname “Joe” originated so I did some research. It seems that in 1913 the then Secretary of the Navy, Josephus Daniels, banned alcohol from US Navy warships. The strongest thing sailors could enjoy was a cup of coffee so they began calling it “Joe”. Now, I don’t know if this was an affectionate or sarcastic term but, I can only imagine how salty those sea dogs must have been not being able to enjoy the juice!

Anyway, below are simple instructions on how to brew a good cup of coffee:

1. It all starts here with a good blend of coffee! Try not to skimp because it will definitely dampen the coffee-drinking experience. I always opt for a nice medium blend. If you’re feeling particularly industrious, invest in a coffee grinder and buy fresh beans grinding only as much as you need for each pot you brew. I find that some of the pre-ground blends brew just as nicely; I usually buy whole beans and grind the beans in the store. Use a “medium” grind for drip machines and “course” for a French Press to prevent grounds from getting into your cup of coffee.

2. Do NOT freeze or refrigerate coffee but store it in an air-tight container kept in a dark spot. Coffee will pick up undesirable frig or freezer “tastes”…yuck!

3. For auto drip pots, add one cup of fresh, cool water for each one scoop of coffee – where a scoop equals two tablespoons or 1/8 of a cup. Turn the brewer off immediately when the coffee is done brewing. Burnt coffee is just plain awful and when I am served the same in restaurants, I always send it back, instigating a bewildering (or is it annoying?) look from some servers who don’t appreciate the appeal of a good cup of coffee. Each send-the- coffee-back episode totally embarrasses daughters, BTW.

For a French Press, heat water until it is just about to boil. Pour the water over the coffee beans (same ratio as with a drip pot) and give the beans a quick stir. Put the French Press lid on BUT WAIT 5 minutes before pushing it down.

4. Enjoy!

The cup in the photo above belonged to my dad….it is from the cafeteria where he worked at least 35 years ago. It’s a nice, heavy cup…perfect for a cup o’ joe...my father’s name!

Sunday, May 8, 2011

Happy Mother's Day

I am a 50-something year old woman (gosh, remember when we thought 30-something was old, and heaven forbid, 40-something!) and I am lucky enough to still have my mom. This is a photo of my mom and dad the day they got engaged when my sister, brother and I were just a twinkle in their eyes! Don't know why my dad is wearing a hat!

Merriam-Webster defines a mother as follows:

I redacted #4 and you can probably figure out why!

This is a rather mechanical definition and I’d like to suggest that a mother is much more than the definition offered. I could go on about the buttons our mother’s mended, the snacks she packed, the boo-boos she kissed, the puzzles she put together with us, or the stories she read…..these are loving reactions of which any caring person is capable.

But a mother loves her children even when it is difficult to do so. She is often the inspiration (even when we don’t realize it) for the things we do that matter. She understands and respects silence, rejoices in our stories, and embraces our successes. She sits back, observes and lets us make our own decisions (even when she knows that they may be a bit wayward) but knows when to instinctively intervene. She understands that sometimes we don’t want solutions to our problems…we only want someone to listen. And when we do need guidance or a little push, she is a natural and patient philosopher and coach.

Today, I’d like to say thank you to my mom for the things she taught me and for the lessons she let me learn on my own. For supporting my decisions and helping me in innate ways that are difficult to measure or calculate. For giving me the roots to grow, the tenacity to soar, and for assisting me with the puzzle pieces of life.

Happy Mother’s Day to all the moms, grandmothers, aunts, godmothers, cousins, sisters and anyone else who loves and has made a difference in the life of a child. And if your mama is in heaven, know that she is looking down and smiling..so pleased and proud of her life's work!

Friday, May 6, 2011

Parsley and Artichoke Pesto

When you think pesto, you usually think basil, right? Me too….until Tuesday. I made artichoke pesto that instructed me to use parsley as the main herb.

Parsley?

We have already established the fact that I am a bit rebellious but that I also try to follow instructions for fear of retribution, so this no basil thing presented an interesting conundrum for me (not that using parsley instead of basil is a particularly daring maneuver, but you get my point). So, while in the Co-op buying the ingredients, I briefly considered defying Giada and substituting basil…the more traditional pesto ingredient. I had both bunches in my hand….

Parsley won.

So glad, because as I worked my food processor magic (the best invention ever), the most fragrant and beautiful pale green sauce emerged. Basil, an intense herb, would have suppressed the other flavors, so something a little more subtle, like parsley, really does work better with the blend of artichokes, walnuts, lemon and garlic the recipe called for. I tossed with fresh, but store bought, fettuccine.... simple and delicious. This would also be lovely made with mint and served with roasted lamb or pork….yum.

Parsley Artichoke Pesto
1 8 oz package of frozen artichoke hearts (I used a 13 oz can)
1 cup of flat-leaf parsley
½ cup chopped walnuts
Zest and juice of one lemon
1 garlic clove (I added 3)
½ teaspoon each of sea salt and fresh ground pepper
¾ cup of extra virgin olive oil
2/3 cup of freshly grated Parmesan cheese

In a food processor combine the artichokes, parsley, walnuts, lemon zest and juice, garlic, salt and pepper. Chop fine, stopping a few times to scrape the sides.

With the processor going, drizzle in the olive oil.

Transfer the pesto mixture to a bowl and stir in the Parmesan cheese. Add the hot pasta, using some of the pasta water to adjust the consistency…I had to use about ¾ cup.

BTW… it was my turn to cook.

We also had a fresh green, pear and gorgonzola salad and leftover Torte della Nonna for dessert.

I also served tea in my most recent pottery project..next up...a casserole dish (which should take the rest of the semester - I'm just saying).

Thursday, May 5, 2011

Brownie Cupcakes

Browine truffle cupcakes I made for older daughter's birthday. The brownies are from a mix -- Trader Joes -- but the icing is from scratch. Because this icing is so smooth and velvety, it pipes very nicely! Younger daughter added the strawberries for a pop of color and flavor!

Buttercream Icing
1 stick of butter
1 cup of shortening
1 teaspooon of vanilla extract
3 1/2 to 4 cups of confectioners sugar
2 tablespoons of milk

Cream together the butter and shortening with an electric mixer. Add the vanilla. Slowly add the sugar, 1/2 cup at a time. I add the milk as needed to thin the icing as I incorporate the sugar.

Monday, May 2, 2011

Torta della Nonna

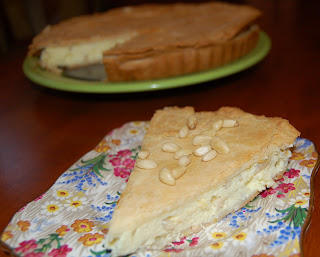
While in Italy, we passed many bakeries but we were often unable to stop because we were trying to keep 40+ people together during the tour! Anyway, I frequently saw Torta della Nonna – Grandmother’s Cake – in the window of these bakeries and it looked so incredibly delicious that I just had to make it! My mom and sister came for dinner on Saturday evening and their visit offered the perfect opportunity to bake this creamy little treat.

I checked my Giada, Lydia, Carmines and Italian Summer cookbooks, but to no avail (what gives girls?) so I searched the Internet and Mario Batali came through!

Torta della Nonna

Ingredients

Pastry:

2 cups allpurpose flour
1 egg pus 2 yolks
1/2 cup sugar
3 tablespoons sweet butter and 3 tablespoons extra virgin olive oil melted together
1/2 teaspoon vanilla extract
Filling
2 cups fresh ricotta (sheep's milk is best)
1/2 cup pine nuts
1/2 cup sugar
Juice and zest of 1 lemon
3 eggs

Directions
Preheat oven to 375°.
To make the pastry, make a well of the flour, place egg, yolks, sugar, butter and olive oil mixture in center and proceed as you would with fresh pasta, i.e. bring flour in bit by bit until liquid in well is thick enough to bring together with hands. Knead until dough is smooth and then allow to rest 10 minutes. I was running short on time so I used pre-made pie crusts from Immaculate Baking Company.


Meanwhile, make the filling by mixing together the ricotta, pine nuts, sugar

Add lemon zest, juice and eggs in a bowl until creamy.

To assemble, roll out the pastry to form two 12 inch circles. Place one circle down to line the bottom and sides of the pan. Spread the ricotta mixture evenly over this layer. Place the remaining circle of dough over the top and pinch together the edges.

Place in oven and bake for 35 to 40 minutes. Remove and serve warm or at room temperature. Sprinkle some pine nuts on top for a nice presentation! Some other versions of this recipe do not call for a top crust….next time I’ll try it that way.

While this was baking the house smelled absolutely heavenly. The nuttiness of the pine nuts (pinoli in Italian and they are really seeds but that’s a detail) blend so nicely with the creaminess of the ricotta and the zestiness of the lemon. So melt-in-your-mouth good, not too sweet and perfect with an espresso or spot of tea!

Tip: Pine nuts go rancid easily so to preserve them, put them in the freezer.

Sunday, May 1, 2011

Giglio della valle

My annual clipping of the “Lily of the Valley." My favorite flower, displayed in my treasured hat lady vase, serves as a simple -- but oh so fragrant -- centerpiece!

As a teenager, my sister and I used to wear Muguet Desbois perfume….its fresh floral scent smelled just like these aromatic little bells. Another classic by Coty that many of us wore….the exotic and citrus-inspired Emeraude. And then, there's always Windsong. Isn’t it funny how we randomly remember stuff while doing other things? What are some of your favorite classic scents?