
I had some frozen meatballs and sausage left over from our Christmas dinner so I decided to make Timpano. But first, for inspiration, I watched the movie “Big Night.” Big Night is the story of two brothers who immigrated from Italy and opened an Italian restaurant. The restaurant is struggling and they are trying to save the same from certain bankruptcy. One brother, Secondo, the businessman of the duo, tries – in vain – to convince his irascible chef brother, Primo, to offer mainstream and predictable food to encourage patrons. The idealistic chef is insistent and believes that when impeccably prepared, traditional Italian foods are offered the palate of the public will eventually change and the people will then come. Primo says “To eat good food is to be close to God.” Italian Food is the star of this movie and the leading lady is the “Timpano.”
Timpano is a traditional Italian dish that is large, hearty and can feed a lot of hungry people. You can make this dish with any pasta (the tubular varieties work best), meat or cheese, such as leftover spaghetti and meatballs. The pasta is served inside a crust and the result is total bliss.

To make Timpano, you need a Timpano bowl or basin. I ordered my 14” enamel Timpano basin from amazon.com. It came in different colors and I ordered my favorite color, red. The basin is oven and freezer safe with a baked on porcelain enamel finish that makes it easy to clean.
Ingredients2 packages of store-bought puff pastry dough
1 large container of Ricotta Cheese combined with an egg and Parmesan cheese
2 cupa of Italian Blend Cheese
2-4 cups of meat, sliced into bite-size pieces (meatballs, sausage, pork, grilled chicken…mix it up!)
4 hard boiled eggs
4 cups of sauce (gravy)
1-2 pounds (depending on how many people you are feeding!) of ziti, penne or rigatoni pasta that's been boiled to al dente (still a little chewy…it will cook some more while being baked)
2 tbsp. of olive oil
All ingredients should be at room temperature for easy handling and to not pre-cook the puff pastry.
Directions
Coat the bottom of the Timpano pan with a thin layer of olive oil or butter and line the pan with the puff pastry.
Begin to layer the ingredients.

Pasta

Ricotta

Eggs

Meat
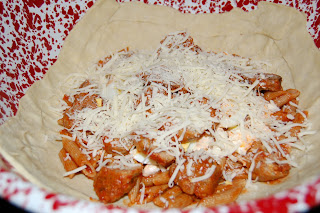
Cheese
It's like you’re making a lasagna. Repeat the layers.

To seal the Timpano shell, place a second sheet of puff pasty over the mixture to meet the bottom sheet pinch together to seal. Poke holes in the top of the puff pastry to allow air to escape during baking. Brush with olive oil.

Bake the Timpano at 400° for 45-60 minutes. Check periodically and if the crust begins to burn, cover with foil.
ServingTo remove the Timpano from the pan cover the top of the timpano with a large plate and flip the pan over so that the Timpano comes out upside-down onto the plate.

The mixture has to solidify before you can cut it so let it rest for 20 minutes after removing it from the oven.

Timpano is traditionally into "V" shaped slices, like a pizza or pie. Serve with a nice salad and a good bottle of Italian red wine.
What I will do differently next time.Next time, I will use a smaller, oven-safe bowl. The Timpano bowl I purchased is lovely, but too large and cumbersome to work with. I am thinking about mini-Timpanos...how fun would that be!
Frozen pie crust may be easier to work with than the puff pastry and next time I will try that instead.
The whole wheat pasta did not work for me. Some recipes just scream for the more traditional stuff!
I’ll be more generous when greasing the bottom of the bowl prior to filling it with the Timpano ingredients.
Much like flipping a cake, flipping the Timpano can be tricky business so I’ll loosen the sides of the Timpano with a small spatula. One side did not survive as neatly as hoped. My photo is strategically positioned to spare you the buckle but it's important to talk about our mishaps so we can learn from them.
I combined the pasta with gravy before I filled the Timpano, but I did not add more gravy with each layer…next time I will. It was a little dry, but I offered extra gravy when serving.

My layers weren’t as obvious as I hoped when I sliced into the Timpano so next time when filling, I will make each layer a little thicker. The dished solidified nicely though.


