Pages

Saturday, March 30, 2013

Polenta with Tomato Sauce and Mozzarella

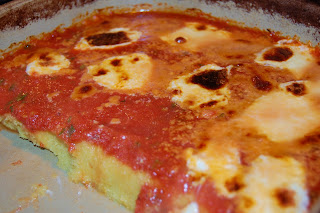
It was Architect's turn to cook on Wednesday night and she made Polenta with Tomato Sauce and Mozzarella, aka Polenta Parmesan. This dish was so incredibly tasty and satisfying that we hardly noticed that it was not made with the usual cast of characters…chicken, eggplant, veal, tilapia, or crab cakes. Yes, crab cakes.  Crab Cake Parmesan was the special one night at a local BYOB and I ordered it just for the experience.  It was ok….I should have ordered my go-to dish at an Italian restaurant, homemade gnocchi.

Architect’s Polenta Parmesan was delectable.  Polenta is ground milled corn and it naturally gluten-free.  Corn is native to the “New World” and was grown and cultivated by Native Americans in the ideal climate of Central America. European explorers brought corn back to the “Old World” and adapted the crop to thrive in the more moderate European climate. Italians eagerly adopted the crop – especially the poor people in Northern Italy – promptly added a dish to their culinary collection known as "polenta" which simply means ground corn.  Polenta can be served as a side dish or as a main course substitute for pasta since it easily absorbs the tastes of the many sauces you can serve with it.  

The first thing Architect did was make a simple tomato sauce.  Melt 4 tablespoons of butter in a pan and added 2 cloves of garlic.  Cook that for about 1 minute then add one large can of San Marzano tomatoes, crushed. Simmer for 20-25 minutes, season with sea salt and 2 tablespoons of chopped parsley.  Marjoram would be a nice surrogate for parsley and to spice it up a bit, you can add red pepper flakes.

To make the polenta, you will need:
1 cup of polenta.  Architect used Estancia Organic Polenta.
3 cups of broth
3 tablespoons of gated Parmesan Cheese

Bring the broth to a simmer in a large saucepan.  Add the polenta in a thin stream, stirring all the while with a spoon over medium heat.  Continue for a minute or so until the polenta just separates from the sides of the pan.  Add the cheese if using and continue stirring until the cheese has disappeared.

To assemble the Polenta Parmesan, spread the polenta into a baking pan and top with the tomato sauce.  Place thin slices of mozzarella cheese on top and some more Parmesan cheese.  Bake at 375º for 25-30 minutes until the cheese melts.   Place in the broiler for a few minutes to brown the cheese.

The “boys” of our crew joined us so they got to experience our weekly gathering and it was fun to host then!  They serenaded us with their ukulele standards.  For dessert, we had a delicious pistachio apricot cake…more later. 

Saturday, March 23, 2013

New York, New York

About a week ago, sister, best friend, best friend’s friend and I boarded the 5:15 a.m. train to New York City.  In my opinion, going to NYC for any reason is a treat, but our particular mission that day was primarily to see the LIVE with Kelly & Michael show.

After a harrowing (seriously, I think the cab driver skimmed a few other vehicles!) taxi cab ride from Penn Station to the studio located at 67th and Columbus Avenues and a 45 minute wait out in the freezing cold, we finally filed into the studio lobby.  After another short wait in the lobby, during which we were encouraged to purchase Kelly & Michael swag (I purchased a football-type shirt with the number “1” on the back representing the duos first season) we were seated.  Since we had tickets and were fairly close to the front of the line, we were able to sit almost directly in front of the hosts, about three rows from the set.
Kelly is absolutely adorable, very sociable and funny.  Michael is as charming as the day is long – and let’s not forget handsome and as fit as a fiddle – and took the time to talk with and pose for photos with other guests. 

If you never been to a live show, I will tell you this…it’s a lot of work.  I was exhausted by the time we left the studio.  There are cues – courtesy of Gelman who is a hoot – to clap and clap harder and faster.  Cues to oooooh and aaaaah, cues to laugh and cues to stop.  Not that we wouldn’t have done those things anyway but, for the love of God, I took the day OFF from work!  On the day we visited Josh Henderson, who plays John Ross Ewing on the new Dallas series, was the guest and Kelly and Michael were reviewing some cereal that was supposed to improve your love life, so you can imagine the frenzy that followed!

After taping, we took a cab to the Honora Pearl Shop, located at 30 East 57th Street where we browsed the absolutely gorgeous selection of pearl necklaces, bracelets and earrings displayed. 

Best friend and I bought a strand of navy blue pearls however UPS won’t deliver my little jewels without an adult signature.  Since Stella doesn’t count as an adult and the only other adults in the house are otherwise occupied during the day, I have to figure out how to secure my booty! You can check out the Honora selection here.

Next, it was lunch at Becco, located in NYC’s famous Restaurant Row.  The restaurant is owned and operated by Lidia Bastianich and her son, Joe.  The Executive Chef, William Gallagher, learned how to cook in his grandmother’s kitchen…I knew there was a reason the dishes were so tasty!  The name Becco is a derivative of the Italian verb, “beccare” meaning to peck or nibble.... and peck and nibble we did!
Everyday, the restaurant offers a different three-pasta special (you get all three!) and on the day we visited the pasta selections were Penne with a Veal Bolognese, Mushroom Ravioli with a Sage Truffle Butter Sauce, and Pappardelle with a Tomato Basil Sauce.  I eat a lot of wonderful meals, both home cooked and in restaurants, and I have go to say that this pasta trio was so incredibly delicious and we could not stop eating it….PLUS, the restaurant offers pasta refills…can you imagine!!!??? 

As if the pasta was not enough, we each ordered an entrée.  My three travel companions ordered the Tagliata di Manzo, grilled beef tenderloin served over arugula and topped with freshly shaved Parmigiano Reggiano cheese and olive oil. 
 
I ordered the Pollo al Limone, sautéed chicken breast with lemon, Cerignola olives, capers and sautéed greens. 

It was all exceptional.

By the time we finished lunch, we were stuffed BUT, did that stop us from ordering dessert?  Of course not! We ordered the dessert sampler that consisted of Italian Cheesecake with Strawberry Sauce, Chocolate Mousse Cake with Cherries and Chocolate Sauce, Panna Cotta, and Italian Bread Pudding.  So. Damn. Good.

We finally rolled out of the restaurant around 3:00 and it was time to head back to the train station for our train ride home.  It was an absolutely wonderful day!   

Sunday, March 17, 2013

Irish Soda Bread

Happy Saint Patrick’s Day everyone!  As promised, I am posting the simple but oh-so-tasty recipe for the Irish Soda Bread I made.

I often wondered why it is called soda bread and the answer is literally in the list of ingredients…soda bread contains sodium bicarbonate, also known as baking soda, instead of yeast as a leavening agent.  This particular recipe also calls for buttermilk.  It’s the buttermilk that reacts with the baking soda to form tiny bubbles of carbon dioxide, that, together with the other ingredients of butter, flour, sugar, salt, and currants, give this bread its melt-in-your-mouth yumminess. The buttermilk can be replaced by yogurt or even Irish stout to make it even more authentic. 

I used Kerrygold Pure Irish Butter made from the milk of cows that graze on the grassy green hillsides of Ireland.  You can read about my trip to Ireland last year with sister, brother and sister-in-law here.

Enjoy this soda bread with some softened Irish butter, jam, and a cup of tea for a perfect (and early!) St. Patrick’s Day celebration.

Irish Soda Bread
From:  Kraft.com
Ingredients
3 ¼ cups flour
1/3 cup plus 1 Tbsp. sugar, divided
1 teaspoon baking powder
1 teaspoon baking soda
1 teaspoon salt
½ cup cold butter, cut up
1-1/3 cups buttermilk
½ - ¾ cup of currants

Directions
HEAT oven to 350°F.

MIX flour, 1/3 cup sugar, baking powder, baking soda and salt in large bowl. Cut in butter with pastry blender or 2 knives until mixture resembles coarse crumbs. Add buttermilk and currants; stir just until moistened.

PLACE dough on lightly floured surface; knead 10 times – don’t over knead! Shape into 2-1/2-inch-thick round. Place on baking sheet sprayed with cooking spray. Cut deep 1/2-inch "X" in top of dough; sprinkle with remaining sugar.

BAKE 1 hour or until golden brown. Remove from baking sheet to wire rack; cool completely before cutting into wedges.

Saturday, March 16, 2013

Wild Rice and Mushroom Soup

In these parts, it’s not been particularly cold this winter, but the sun rarely shone (or is it shined?) leaving us with gloomy days and even gloomier moods!  Apparently, we had a visit from a comet (not the famous reindeer, but an actual celestial object consisting of ice and dust and a gassy tail), PanStarrs, visible for a few days in March.  Perhaps the sun just doesn’t like intruders....a this is my dance space; this is your dance space sort of thing.

Regardless, our dismal days continue to be the perfect excuse to serve soup and Foodie made a delicious Mushroom and Wild Rice version from Cooks Illustrated.  Foodie is so funny…she said-- in a rare move --, she “followed the recipe exactly,” except she substituted brandy for sherry, because she didn’t have any sherry in the house.  As you know from previous posts, she is an excellent cook and is always tinkering with recipes to produce satisfying flavors.  We, of course, never complain because the results are always delicious despite her customizations.

This recipe is from the January/February 2013 edition of Cooks Illustrated.  I talk about why I love Cooks Illustrated in this post, but I offer another reason.  Not only do I enjoy the way CI dissects recipes into comprehensible parts, but they also enlighten the reader with beautifully written nuggets of information about the ingredients they use.  For instance, in the article that precedes this recipe, the author, Celeste Rogers, talks about wanting to give the mushrooms an unmistakable presence in this recipe.  She instructs that she sautéed a full pound of cremini mushrooms in a Dutch oven saying she “was left with a fond at the bottom of the pot that [she] easily liberated with a generous pour of sherry.  A few minutes of reduction left [her] with a fortified mushroom concentrate to which [she] added chicken stock (for savory depth) and water before stirring in the cooked rice.”  

Culinary prose is so evocative…and mouth watering.

The nuttiness of the rice and the meatiness of the mushrooms combine nicely to give this soup the earthy quality that makes it so delicious.  Additionally, the dried shiitake mushrooms are “ground into a powder and stirred it into the broth for full-bodied mushroom flavor” and using the rice’s leftover cooking liquid boosted the flavor of the wild rice.

Wild Rice and Mushroom Soup
From:  January/February 2013 Cooks Illustrated

Ingredients
¼ ounce dried shiitake mushrooms, rinsed
4 ¼ cups of water
1 sprig of thyme
1 bay leaf
1 garlic clove, plus 4 cloves, minced
Salt and pepper
¼ teaspoon baking soda
1 cup wild rice
tablespoons of unsalted butter
1 pound of cremini mushrooms, rinsed, trimmed and sliced
1 finely chopped onion
1 teaspoon tomato paste
2/3 cup dry sherry
4 cups of chicken stock
1 tablespoon soy sauce
¼ cup cornstarch
½ cup heavy cream
¼ cup fresh chives, minced
¼ teaspoon lemon zest, finely grated.

Directions
Heat oven to 375°.  Grind shiitake mushrooms in a spice grinder until finely ground, this will net about 3 tablespoons. I suppose you could also use a mini food processor.

Bring 4 cups of water, thyme, bay leaf, garlic clove, ¾ teaspoon sale, and baking soda to a boil in a medium saucepan over high heat.  Add rice and return to boil.  Cover saucepan, transfer to over, and bake until rice is tender, 35-5- minutes.  Strain rice trough fine-mesh strainer set in a 4 cup liquid measuring cup (to reserve), discard the thyme, bay leaf and garlic.  Add enough water to the reserved liquid to measure 3 cups.

Melt butter in a Dutch oven over a high heat.  Add cremini mushrooms, onion, minced garlid, tomato paste, ¾ teaspoon salt and 1 teaspoon of pepper.  Cook, stirring occasionally, until vegetables are browned and a dark fond develops at the bottom of the pot, about 15 minutes.  Add sherry, scraping up any browned bits, and cook until reduced and the pot is almost dry, about 2 minutes.  Add ground shiitake mushroom, reserved rice-cooking water (complete with its nutty starchiness), broth, and soy sauce and bring to a boil.  Recue heat to low and simmer, covered, until onion and mushrooms are tender, about 20 minutes.

"Fond” is from the French word for "bottom." In the culinary world, it means those little roasty bits that gather at the bottom of the pot follwing the browning process.

Whisk cornstarch and remaining ¼ cup of water in a small bowl.  Stir cornstarch slurry into the soup, return to a simmer and cook until thickened, about 2 minutes.  Remove pot from heat and stir in cooked rice, cream, chives and lemon zest.  Cover and let stand for 20 minutes.  Season with salt and pepper to taste and serve topped with some additional chopped chives.

Architect contributed the most creamy and delectable Goat Cheese Cheesecake  made with a ginger-snap crust.  We also had homemade Irish Soda Bread and I'll post the easy recipe tomorrow in honor of Saint Patrick’s Day.

Tuesday, March 12, 2013

Toe Pick

The process of finishing a sock gives new meaning to the term "toe pick" (a reference to the 1992 ice skating movie that older daughter loves, Cutting Edge, in which a hockey player turns pair figure skater due to an injury...not Oscar worthy but mildly entertaining). It's a little difficult to work in such a tiny area with several needles! Too bad that I had to rip it all out....look closely, it's inside-out.  But like every good knitter, it needs to be right, so my knitting teacher ripped the stitches out to the gussett, commonly known as the heel of the sock.  I start again.

Here's what happened.  Basically, I had the inside of the sock facing me while knitting in the round and to achieve the stockinette stitch on the outside of the sock, the outside of the sock had to be facing me while knitting in the round.  I just don't know what I was thinking.  Maybe it was the effects of my recent anesthesia...or maybe I just need to knit more so I recognize a disaster mistake in the making!  Regardless, we learn from our little blunders!

I wanted you to see that I finally did finish one sock....even if it is inside-out!

Sunday, March 10, 2013

Indian Split Pea Soup with Seared Shrimp and Tomato Relish

The soup-themed dinners continued at Singer’s house on Wednesday night.  She served the most delicious dish that I’m not sure can justifiably be called a soup…more like a meal in one dish.  Different from a casserole or a stoup (a Rachel Ray favorite) this satisfying one-dish meal recipe is from the Dean & DeLuca Cookbook, page 80. 

When older daughter was a little girl, we used to live in Manayunk, a trendy little neighborhood in the northwest section of Philadelphia.  I used to love to put her in the “umbroller” and stroll down to Main Street.  Older daughter was a very cute and very gregarious child and she would often say hi to people and she (somehow) developed the talent for saying hello to cute guys (I swear I was not behind the stroller encouraging the salutation). Anway, there was a little coffee shop on Main Street, La Petite Gourmet, and I remember sitting at the café tables with her on my lap, sipping a latte, nibbling on a muffin and taking in the sights, tastes and sounds of my new hood. 

I assure you that this story is connected to the recipe.

Later, when younger daughter was a baby (we still lived in Manayunk for a short time, although in another house) and the charming little coffee shop was replaced by a Dean & Deluca.  The new proprietors retained the painted tin ceilings but the simple, tasty menu was replaced by fancy salads, sandwiches topped various and spicy chutneys and French pastries, all too elaborate for the eight-year-old palate (if food wasn’t some hue of “pale” older daughter was not the least bit interested). We still enjoyed our little pastry promenades down the hill – the walk neutralized the calories in the lattes – but the mood and food were merely substitutes for the warm and inviting atmosphere of the original coffee shop. 

Fast forward many years…Singer was browsing around a thrift shop and found a second-hand Dean & DeLuca cookbook …good thing, because she was able to make this delicious concoction of split peas, Indian spices and seared shrimp…so incredibly good.  The base for this soup is dal, a thick Indian stew prepared from puréed split peas, lentils or beans.   Dal is typically served along side of a main dish but this recipe takes dal out of a supporting role and makes it the star of the show. 

Indian Split Pea Soup with Seared Shrimp and Fresh Tomato Relish
From:  The Dean & DeLuca Cookbook

Ingredients:
For the spicy shrimp
12 large shrimp, shelled
1/2 teaspoon ground cumin seed
1/2 teaspoon ground cardamom seed
1/4 teaspoon finely minced garlic
1/4 teaspoon ground coriander seed
1/4 teaspoon ground cinnamon
1/8 teaspoon ground clove
1/8 teaspoon salt
pinch of cayenne pepper
2 tablespoons light vegetable oil, such as safflower

For the soup
1 tablespoon unsalted butter
1 cup finely minced onion (about 2 medium onions)
1 tablespoon plus 1 teaspoon finely minced garlic
1 tablespoon plus 1 teaspoon finely minced fresh ginger
1 teaspoon finely minced jalapeno (adjust to desired heat)
2 cups yellow split peas, washed
1 teaspoon ground coriander seed
1 teaspoon ground cumin seed
1 teaspoon celery seed
1/2 teaspoon ground cinnamon
1/4 teaspoon ground clove
2 quarts chicken stock plus additional if necessary

For the relish
1 cup finely diced fresh tomato
1/4 cup finely chopped onion
1/4 cup minced cilantro leaves plus additional for garnish
1/2 teaspoon minced jalapeno
2 teaspoons fresh lemon juice
1/2 teaspoon grated lemon rind
 
Directions:
1. Make the spicy shrimp: In a bowl toss the shrimp with the cumin, cardamom, garlic, coriander, cinnamon, clove, salt, and cayenne pepper. Marinate, refrigerated, for 1 hour.

2. Make the soup: In a heavy-bottomed pot, melt the butter over moderate heat. Add the onion, garlic, ginger, and jalapeno. Cook, stirring, for 2 minutes. Add the split peas, coriander, cumin, celery seed, cinnamon, and clove. Stir to mix well. Add the chicken stock, stir again, and bring to a boil. Reduce heat to low, and simmer slowly, partially covered, for about 1 hour, or until split peas are just soft. (You may need to add additional chicken stock if peas become too thick and dry.)

3. While soup is simmering, make the relish: Toss all ingredients together in a bowl. Season to taste.

4. When soup is ready, butterfly the marinated shrimp, removing the veins. Place a heavy sauté pan over moderately high heat. Add the 2 tablespoons of vegetable oil, swirling around the pan. Add the shrimp, cut side down, and sauté for 2 to 3 minutes, or until just cooked. Turn the shrimp over, and cook for 1 minute. Remove shrimp from pan.

5. With a wooden spoon, crush a few of the soft peas in the soup against the side of the pot. Stir well. (If the soup is too thick, add a little chicken stock.) Season to taste. Ladle the hot soup into 4 wide soup bowls. Mix in most of the tomato relish, reserving about 1/4 cup. Place 3 shrimp in the center of each bowl. Divide the reserved tomato relish among the bowls, placing it in the center of the shrimp. Top that with a few fresh cilantro leaves. Serve immediately.

Serve as a main course with steamed Middle Eastern bread and a cucumber raita.

For dessert, we had a delicious blondie from a recipe from smitten kitchen.  I love the photos on this site....I will have to take note! Foodie adapted the recipe to include browned butter, bourbon, and carmelized pecans.  Then, she roasted some sliced blood oranges and blueberries and placed them on top.    We almost polished off two bottles of wine.  What a life.
 

Tuesday, March 5, 2013

Grandmom's Beef Vegetable Barley Soup


Sadly, I did not know my Irish grandmother, but I knew and absolutely adored my Italian grandmother.  She was kind, gentle and wise…. just the way an Italian grandmother should be.  Plus, she always smelled good, like Jergens Original Scent lotion, and to this day, that smell reminds me of her.   She was also a very good cook and since my family lived with her, we were the lucky and frequent recipients of her simple but extraordinary cookery prowess.   

So many things remind me of her...stewed prunes, pepper and eggs, gravy and meatballs.  I could go on and on.  She used to make a beef vegetable barley soup that was so good. Seriously. So damn good.  We used to wait for hours for it to be ready….anticipating how the beef bits would just melt away in our mouths. When we finally sat down to eat, not a word was spoken...a rare occasion in our loud but loving house.  But, like many other instructions and stories -- that are often shamelessly embellished -- the recipe was never written down, so my mother, sister and I did our best to replicate it. 

We knew a few things for sure….we knew she used beef short ribs, a bag of frozen mixed vegetables, barley, maybe cabbage, and that the soup had a tomato base.  So with that information, and the help of various books and on-line resources, I cobbled together the following recipe.

Grandmom’s Beef Vegetable Barley Soup
By:  My Family

2 lbs. beef short ribs
1-2 Tablespoons of olive oil
1 quart of tomato juice (we think my Grandmom used a few cans of tomato sauce and equal amounts of water)
32 oz of beef stock
1 large onion, chopped
4 stalks of celery, chopped to 1 inch pieces
6-8 basil leaves, slivered (I just stacked them up and use scissors to cut them right into the soup)
1 bag of frozen mixed vegetables (carrots, corn, string beans, lima beans)
2 garlic cloves, chopped (don't use garlic powder...garlic is too good not to use whenever possible)
½ cup of regular barley (not the quick stuff)
Salt and pepper to taste

Coat the pot with olive oil and brown the short ribs on all sides. Deglaze the pot with some water and then add the other ingredients. Bring the mixture to a boil.  Reduce the heat and let the soup simmer for a good 4 hours.  Remove the ribs and pick the meat off of the bones.  Discard the bones, chop the meat and add it back to the soup. Serve with crusty Italian bread.

They say that just a sniff of something can evoke the sweetest memory and, as this soup was cooking, my house smelled just like my Grandmom’s house in Philadelphia on North 22nd Street and, for an instant, I was a kid again.  In the above photo we are standing in front of that very Philadelphia rowhouse in which I grew up ...notice my Grandmom's shoes...I remember them and recently bought a pair almost like them!  Since just the soup's aroma took me instantly back 45 years, I was hoping it would taste like Grandmom’s recipe…and you know what, it did!  Don't you just love when things like this work out!?  It was a little thicker than her version, but a little extra stock took care of that.  Plus, making this soup gave me another opportunity to use my beautiful, new yellow pot...that Grandmom would have loved!
 
I was elated but also a little sad while making this soup, if that makes any sense. I miss my Grandmother so much but take comfort in that I am named after her mother, Giovanna.  Of course, the name was translated to English and although she didn't mind the English translation, she would still call me Giovanna sometimes.  A cherished memory.

If my siblings or Italian cousins are reading this post, please make this soup.  It will take you immediately back to those wonderful days on North 22nd Street and Grandmom sitting on the cement landing in her green and white woven beach chair, minding her garden, talking to neighbors in broken English, and watching the world go by.

Sunday, March 3, 2013

Yarn Potholder

I often wonder what I should do with the bits of yarn I have left over after a project.  Some people make fanciful and colorful shawls or scarves out of the surplus but that sounds like another project to me and we all know about my attention span when it comes to large knitting projects.  Although, I am doing great in sock class and will post “progress” photos in a week or so.

Do you remember making potholders on a metal weaving loom when you were little….I do.  I used to sit for hours thinking up ways to weave unusual patterns but there were never enough loops of the desired color.  Heaven forbid if you wanted to make a monotone potholder!

I’m strolling around the Dollar Store one day and I mosey into the toy section - who knows why - and what should I see but a Weaving Loom, complete with 120 colorful loops, and a weaving hook and instructions (I didn't need those).  It occurs to me that I could weave a potholder using the bits of yarn I have.  So the weaving loom comes home with me.
 
I only had $1 bills in my wallet so it's a good thing I was in the Dollar Store.

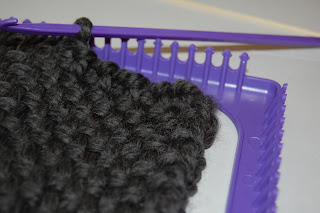
Creating a potholder on a weaving loom using yarn is easy-peasy.  You will want to use a heavier weight yarn or two strands of a lighter weight yarn.  Here’s what you do:

Start in the lower right hand corner and tie a loose knot around the peg.  Weave loosely up and down the loom.

When you get to the lower left, it is time for you to weave across.  Do this the same way you did weaving with those little loops.  Using the weaving hook provided, weave up and under on row 1, under and up on row 2, up and under on row 3, under and up on row 4, and so on...  You might want to place a chopstick or a skewer in the up/under position to make it easier to separate the strands.

 When you have completed your way all the way up the loom, cut the strand of yarn and just leave it be.
 
Now it’s time to take the loops off the loom.  Starting in the lower right corner, using the weaving hook, lift the first loop off and weave the second loop through it, lift the third loop and weave the third loop through the second loop and so on....

When you get to the end, simply untie the loose knot and pull that strand through the last loop...
 
 
... and you got yourself a potholder!  
 
This is a great craft to do with kids!  I only have Stella the Boston Terrier at home and since she doesn't have opposable thumbs, she wasn't interested in this project.