Last week while having dinner at my house, Foodie mentioned that she made quinoa patties…I said, “yum, you should make those next week!”
She did. They were delicious.
Before dinner and to celebrate Halloween, I gave each of my dinner mates a little crystal spider pin. For those of you who know me, you know I like bugs. Bees, ants, dragonflies, ladybugs, and yes, even arachnids. Now, when I say I like bugs, I mean I like photos, prints, embroidered, knitted and figurines of bugs, not necessarily the real things. This summer, Charlotte, a beautiful crab spider, decided to pay me a visit. I was fascinated by her determined little face munching away on her lunch…another bug. If you’d like to see Charlotte, scroll all the way down. If not, STOP after you read about the apricot torte!
Now for the quinoa patties.
Foodie’s recipe is from a book called Super Natural Every Day by Heidi Swanson
Little Quinoa Patties
Ingredients
2 1/2 cups cooked quinoa, at room temperature
4 eggs, beaten
1/2 teaspoon fine-grain sea salt
1/3 cup finely chopped fresh chives
1 yellow or white onion, finely chopped
1/3 cup freshly grated Parmesan or Gruyère cheese
3 cloves garlic, finely chopped
1 cup whole grain bread crumbs, plus more if needed
Water, if needed
1 tablespoon extra-virgin olive oil or clarified butter
Note: Foodie used Panko instead of breadcrumbs and added lemon zest and juice
Directions
Combine the quinoa, eggs, and salt in a medium bowl. Stir in the chives, onion, cheese, and garlic. Add the bread crumbs, stir, and let sit for a few minutes sot that the crumbs can absorb some of the moisture. At this point, you should have a mixture you can easily form in to twelve 1-inch / 2.5 cm thick patties. You can add more bread crumbs to firm up the mixture or a bit more beaten egg or stock to moisten the mixture.
Heat the oil in a large, heavy skillet over medium-pow heat, add 6 patties, if they'll fit with some room between each, cover, and cook for 7 to 10 minutes, until the bottoms are deeply browned. Carefully flip the patties with a spatula and cook the second sides for 7 minutes, or until golden. Remove from the skillet and cool on a wire rack while you cook the remaining patties.
Foodie served these with the most delicious tomato jam (I will post a recipe soon) and roasted root vegetables. We also had a Caesar salad served in the lovely traveling salad bowl and apricot torte with vanilla ice cream. Foodie showed us the gorgeous cape she knitted to wear in Paris.
Charlotte
Saturday, October 29, 2011
Monday, October 24, 2011
Empty Bowls 2011
This past weekend was the annual Empty Bowl Lunch at the Community Arts Center in Wallingford, PA. For a minimum donation of $10, you can enjoy a simple meal of bread and soup served in a beautiful, handmade bowl.
Empty Bowls is an international grassroots movement created by Potters, other craft people, educators and community servants with a basic mission… to end hunger and food insecurity. Empty Bowl events take place all around the world and the movement’s proceeds are critical to those in need, especially during times of economic hardship. All proceeds from the CAC event benefit the cities of Chester and Philadelphia.
Each donated bowl is stamped with the empty bowl symbol and when all the donated bowls are displayed during the event, participants enthusiastically survey their colorful choices. I chose a lovely, hand built blue and yellow number with lace impressions around the outside...quite nice. I waited in the soup line and opted for a delicious vegetarian chili topped with cheese and sour cream. As you can see from the sign, there were several other delicious choices, all supplied by local establishments, including a venison stew!
It was a lovely event for a worthy cause.
My bowl of choice.
Thursday, October 20, 2011
Pistachio Encrusted Chicken
Everyone is back from Paris, Pittsburgh and Minnesota (some destinations were more glamorous than others!) and it was my turn to cook last night. I made a house favorite, Pistachio Encrusted Chicken.
My kids LOVE this dish!
One of my favorite things to do is to replicate dishes I first enjoyed in a restaurant. I jot down the ingredients from the menu and if I am unsure of something, I ask the server…every now and again you can weasel information from them!
BUT, like a good reporter, I never reveal my sources, so rest easy my aproned friends!
This particular chicken dish is coated with pistachios and topped with caramelized onions and apples and the most velvety and luscious black cherry sauce. That sauce is my nemesis…I am getting close, but I still have not gotten it just right. It all starts with a proper roux, then adding chicken stock and black cherry jelly to achieve just the right consistency, flavor and color. I include the recipe for the sauce on the Recipes tab.
A word about pistachios… not only are they tasty, but they are an excellent source of nutrition as well. Pistachios offer high levels of a plant sterol, phytosterol, shown to reduce cholesterol absorption, lots of vitamin B6, antioxidants, lutein, potassium and dietary fiber. That’s a lot of good stuff packed into one pretty, little nut!
Not me, the pistachio.
Pistachio Encrusted Chicken with Caramelized Onions and Apples and Black Cherry Sauce
Caramelize thinly-sliced onions by sautéing them in two tablespoons each of melted butter and olive oil. When the onions are a nice caramel color, add the apples and sauté until they are caramelized. Set aside.
Fill a bowl with 1 ½ cups of finely ground pistachios and add 1 cup of panko bread crumbs. Mix them up. Add one cup of milk to another bowl. Cut 4 boneless chicken breasts in half and dip each half into the milk, then the pistachio mixture.
Add ½ cup of canola oil to a pan and when hot, pan fry each breast until golden. Do not cook through.
Preheat the oven to 350° and bake the chicken for 35 minutes or until cooked through. Each will be a yummy toasted color.
Serve by placing these crusted beauties on a gorgeous platter, top with the caramelized onions, apples and the black cherry sauce. So incredibly delicious and a little bit fancy!
We also had a salad of field greens, macadamia nuts, and oranges served in the lovely traveling salad bowl and macaroons from France for dessert (that, BTW, came in the prettiest little orange box). We polished off two bottles of wine, including a wonderful red from France, Chateau de Ruth, Cotes Du Rhone.
Sunday, October 16, 2011
Where Did Yinz Go?
I was in Pittsburgh for a few days this past week attending a conference for a professional association to which I belong. I had a great time networking and learning with my First State Chapter members and other regional chapters, including our gracious hosts, the Pittsburgh Chapter. Saturday sessions ended at 12:30 and my plane did not leave until 5:45 so I ended my visit frolicking around the City of Bridges with a wonderful and funny group from the Philadelphia Chapter.
We walked across the Smithfield Bridge over the Monongahela River (does anyone else remember that Rocky and Bullwinkle often mentioned the Monongahela River?) and took the 17 passenger Monongahela Incline up to the charming little neighborhood of Mt. Washington. The Incline was built by John Endres in 1870 and is the oldest continuously operating funicular in the United States. At top of the incline, there was an Outlook that offered the most spectacular views of this lovely city and many of the 29 bridges that cross three rivers in Pittsburgh, the Allegheny, Monongahela and Ohio.
We decided to eat lunch in one of the restaurants not far from the Outlook and we stumled upon the Shiloh Grill. Now, unbeknownst to us, this was a perfect choice for this season of ghosts and goblins! Our verychatty informative and affable server Steve, told us the story of the restaurant. In the early 1900's, the house was owned Peter and Kate Soffel. Peter was the warden of the Allegheny County Jail and his wife used to visit the jail to teach the gospel to the inmates. Well, apparently, the gospel wasn’t the only lesson wifie was preaching because Kate fell in love with one of the prisoners and helped him and his brother – The Biddle Boys – escape. They were caught and so was Kate who spent some time in the slammer for her role in the liberation. It is said that the ghost of Mrs. Soffel still haunts the restaurant and she has been observed by patrons and staff alike.
We did not have a paranormal encounter…unless you see an image in the lower left side of this mirror…what do you think?
I had the tastiest Polish Church Basement Pierogies. These little lovlies were stuffed with potatoes and cheese and slathered in butter & onions. I also had a beer to dilute the artery clogging consequences. A few of my friends had the Aw, You’re Pullin’ My Pork, a rich, slow-cooked pork shoulder sandwich accompanied by the restaurant’s famous Macaroni and Cheese. They also had a beer. Be sure to put the Shiloh Grill on your destination list if you visit Pittsburgh…you won’t be disappointed and you might get a surprise visit!
Following lunch we took the Incline back down the hill and bolted (literally, because we only had 15 minutes) to meet the airport shuttle. It was the perfect end to a very enjoyable visit.
We walked across the Smithfield Bridge over the Monongahela River (does anyone else remember that Rocky and Bullwinkle often mentioned the Monongahela River?) and took the 17 passenger Monongahela Incline up to the charming little neighborhood of Mt. Washington. The Incline was built by John Endres in 1870 and is the oldest continuously operating funicular in the United States. At top of the incline, there was an Outlook that offered the most spectacular views of this lovely city and many of the 29 bridges that cross three rivers in Pittsburgh, the Allegheny, Monongahela and Ohio.
We decided to eat lunch in one of the restaurants not far from the Outlook and we stumled upon the Shiloh Grill. Now, unbeknownst to us, this was a perfect choice for this season of ghosts and goblins! Our very
We did not have a paranormal encounter…unless you see an image in the lower left side of this mirror…what do you think?
I had the tastiest Polish Church Basement Pierogies. These little lovlies were stuffed with potatoes and cheese and slathered in butter & onions. I also had a beer to dilute the artery clogging consequences. A few of my friends had the Aw, You’re Pullin’ My Pork, a rich, slow-cooked pork shoulder sandwich accompanied by the restaurant’s famous Macaroni and Cheese. They also had a beer. Be sure to put the Shiloh Grill on your destination list if you visit Pittsburgh…you won’t be disappointed and you might get a surprise visit!
Following lunch we took the Incline back down the hill and bolted (literally, because we only had 15 minutes) to meet the airport shuttle. It was the perfect end to a very enjoyable visit.
Tuesday, October 11, 2011
My New Pizzelle Maker
Foodie and Architect are in Paris.
Our dinners will resume next week. Can’t wait to hear all about their trip.
I am half Italian and half Irish and grew up with my Italian grandmother so I cherish my Italian heritage. One of my co-workers is also half Italian and this past weekend, she made pizzelles. Pizzelles are Italian cookies that look like thin waffles, usually flavored with vanilla and anise. She brought some into work but lamented that while she finally achieved the thickness she wanted, she was disappointed that they were soft…pizzelles should be crispy. So we chatted and mutually decided that she needed to do a few things differently.
She probably didn’t realize the conversation would appear in a post.
Anyway, that got me thinking that I did not have a pizzelle maker. My grandmother had an old cast iron, stove-top number…it looked like this…black with long, thin handles. Not wanting to be all that rustic and authentic and hoping to avoid certain bodily harm, I bought an electric version. We know I am clumsy, so best not to put me in proximity of a hot, cast iron device.
I turned to my Gravy Wars book for a pizzelle recipe (Grandmom did not document hers…I should call my Aunt Adeline).
Pizzelles
6 eggs
1 ½ cups sugar
1 cup of butter, melted
4 teaspoons of baking power
3 ½ cups of flour
1 Tablespoon vanilla
1 Tablespoon of anise extract
1 Tablespoon of anise seed
“Blend all ingredients and drop by teaspoon onto a heated pizzelle iron. Pizzelles bake in the time it takes to say one (respectful) Hail Mary”…about 30-40 seconds.
If you want to be really fancy, while the pizzelles are still hot, drop Hershey’s chocolate bar sections on the edge of each pizzelle and roll into a tube.
My new electric pizzelle maker.
Sunday, October 9, 2011
Red3
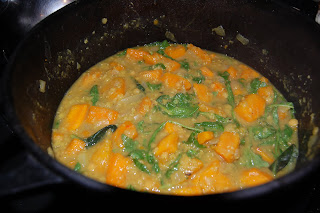
So, I’m walking through the market and I see a lovely vegetable that I first saw at Foodie's house one evening – a red kuri squash. I was unfamiliar with this variety of squash…it is a Japanese variety that resembles a vibrant small, red-orange pumpkin and can be used interchangeably in recipes that call for butternut squash. The flesh is a bit brighter but, like butternut squash, red kuri squash has a nutty and delicately sweet flavor.
Naturally, I was on a hunt for a recipe that featured this little beauty and I found one that I adapted on the Oh She Glows blog:
Spicy Red Kuri Squash and Red Lentil Stew
Olive oil to coat the bottom of the pan.
1 sweet onion
5 cloves of minced garlic
½ teaspoon of red pepper flakes
1-2 teaspoons of curry powder
1 carton of low-sodium chicken or vegetable broth
1 cup of red lentils
3 cups of cubed and cooked red kuri squash (two produced what I needed)
1 bag of zesty greens or arugula (Fresh Express makes a nice packet)
Salt and Pepper to taste
Prepare the kuri squash by pricking holes in the whole vegetable and microwaving for 4 minutes. This will make it easier to cut. Cut off the top, cut in half, scoop out the seeds and peel the skin off with a vegetable peeler. Cube, brush with olive oil, sprinkle with salt and bake at 350° for 20-25 minutes.
While the squash is baking, sauté over the onions, garlic and red pepper flakes in the olive oil over medium heat until translucent. Make sure to use a pot large enough to hold all the goodies…I used my cast iron Dutch oven.
Stir in curry powder and cook another minute or two.
Add the broth.
Add the red lentils.
Bring to a boil. Reduce heat and cook for another 10-15 minutes.
Stir in cooked squash and the greens and cook until the greens are wilted and flavors infused, about 5-10 minutes.
Season with salt and pepper to taste and serve.
So easy and so delicious! This dish has everything you need in it…lentils, veggies, greens…I served for lunch with multi-grain crackers.
Tuesday, October 4, 2011
The $12.99 Platter
Look at this lovely platter I found at Home Goods for $12.99 and, BONUS, it was made in Italy! I love the colors and the pattern. It’s a bit smaller, only 9” x 14”, than some of my other serving dishes and it is exactly what I’ve been looking for! It’s not perfect…some of the glazing is inconsistent and there are some pinholes, but you have to look very closely to see the blemishes. Regardless, I love it!
Italian pottery is very expensive for a reason…it is typically all hand painted and glazed. Pottery has been produced in Italy since the 13th Century and it is known for its beautiful, elaborate and colorful never-fading designs. Crafters often borrowed images found in frescos, paintings and the Bible and this sort of pottery detailing became known as Istoriato or decorated Maiolica.
Eventually Italian towns, such as Siena, became renowned for their high-quality pottery but by the 19th Century, due to competition from France and Germany, and the demand for porcelain, Italian pottery’s popularity waned. Thankfully, a movement to rejuvenate the market was successful and a visit to Italy is not complete without the purchase of an earthenware treasure. Here is a photo of a pottery shop Sister took during our visit to Italy in October 2009.
The piece I found in Home Goods is a pattern called Raffaellesco made in Deruta, a town in Umbria. The pattern was inspired by the work of the artist Raphael, who was smitten with Nero’s grotto paintings. The dragon is the signature design of this pattern and it was believed that the mythical creature - a good luck charm - offered strong winds that safely brought seagoing merchants to their trade destinations.
A true find.
Subscribe to:
Posts (Atom)