It was Singer’s inaugural dinner on Wednesday.
All we could say was yum.
And bravo.
She made the most amazing Cioppino. What, you ask?
Cioppino is a fish stew that is a signature dish in San Francisco. Whatscookingamerica.com explains that “fish stew first became popular on the docks of San Francisco in the 1930s. Cioppino is thought to be the result of each Italian immigrant fisherman adding something from their day's catch to the communal stew kettle on the wharf. Many historians believe that the name is the adaptation of Italian fishermen yelling for all to "chip in." It is also believed that the name comes from a Genoese fish stew called cioppin.” The first explanation makes for a better story so that’s the one I’ll choose to believe and promulgate.
Whatever the origin of the name, this blend of different kinds of fish, vegetables, and herbs is simply delicious and relatively easy to make. And as with any stew, you can throw something in you like and leave something out you don’t. The dish is typically served with toasted bread or baguette and of course, your favorite wine.
Cioppino
Adapted from Giada De Laurentiis, Everyday Italian
2 tbs of Olive Oil
1 Large fennel bulb, chopped finely
1 large onion finely chopped
1 tsp salt
4 large cloves of Garlic finely chopped
3/4 tsp of dried crushed pepper flakes, plus more to taste ( I tend to go for it)
1 28 ounce can of diced tomatoes in juice
1 1/2 cup of wine
2 8 ounce jars of clam juice
1 cup of water
1 bay leaf
Chopped parsley and basil to garnish
1 pd of little neck or manilla clams
1 pd of mussels
3/4 pound of shrimp
3/4 pound of scallops ( cut large in half)
1 1/2 pound of firm fleshed fish (halibut, monk, tilapia)
Directions
Heat the oil in a very large pop over medium heat. Add the fennel, onion and salt and saute until onion is translucent, about 10 minutes. Add garlic and pepper flakes and saute for two minutes. Add the tomatoes with juice, wine, clam juice and water, and bay leaf. Cover and bring to a simmer until the flavors blend, about 30 minutes. When finished use an immersion blender to puree slightly. Note: This sauce can be made in advance and reheated when ready to serve.
Add the clams and mussels to the cooking liquid. Cover and cook for about 5 minutes until they open. Add the shrimp, fish and scallops until just cooked and clams are open, stirring gently about 5 minutes longer. Season to taste, with more salt and red pepper. Sprinkle with chopped parsley and basil.
"The trick to this dish is to be careful not to overcook the shellfish -- otherwise, it will become rubbery." -- Giada De Laurentiis
Serve with garlic/olive oil bread: Broil sliced Italian Bread on one side and then brush with Olive oil, crushed garlic, and kosher salt and broil till bubbly and brown.
The Italian fishermen would be proud.
We also had a Caesar salad served in the lovely traveling salad bowl and we opened three bottles of wine. Three is a first for us. Mercifully, we did not finish the third.
Later we watched the Phillies tie the Braves in the 9th inning and go on to win the game in the 13th inning, breaking a Club all-time win record with 102 wins for the season! They did it for Charlie.
Pages
▼
Friday, September 30, 2011
Wednesday, September 28, 2011
It’s in the Bag
So, I decide to make a roasted chicken for dinner…I figure a whole chicken will give me plenty of leftovers for a couple of lunches during the week.
Paying $10/day for lunch is just plain crazy.
I had to pick some things up at Target and I’m thinking….”I wish they sold whole chickens here because I really don’t feel like going to the market.” As I’m meandering through the fresh produce/meat/bakery/cheese aisle, I spot a handy-dandy Perdue whole roaster, in a bag, ready for the oven. Hmmm, this might be worth a try for $9.99. Among the touted features:
• Fully seasoned;
• Non-caged chickens fed an all vegetarian diet;
• No hormones or steroids added;
• Oven ready…in its own cooking bag;
• Clean-up is a snap.
The directions say to preheat the oven to 400º and remove the chicken from its outer bag (good thing they made that clear). Place the inner sealed bag in a shallow baking dish and cut a 1” slit in the cooking bag to vent during cooking. Roast for 90 minutes or until a meat thermometer register 180º. Remove the chicken from bag and let it sit for 10 minutes before slicing. Use juices remaining in the bag to make a delicious gravy (the recipe for which is also provided on the back of the bag). Note the special directions on the inner bag say "This side up." Hmmmm...
The nutritional facts: not shocking…the sodium content: fair, most likely from the seasoning ingredients.
Sold…and no additional trip to the market.
REVIEW
This chicken did not get “fight for the crispy part” brown (I expected that because it was baked in a bag), it was, however, very moist and succulent. A bit too salty (for me). The fact that I could stick it in the oven and forget about it for an hour and a half was a major plus.
Overall, this chicken is okay…better cold (believe it or not) so, with the leftovers I'll make a tasty chicken salad with pecans and dried cherries. Maybe some Italian Wedding Soup.
I like my beer-can chicken better!
Saturday, September 24, 2011
Turkey Empanadas
Architect hosted our Wednesday night dinner and she made Empanadas… I patiently waited all week for these little treasures. We love when Architect makes her cultural favorites because we don’t often make them for ourselves.
Architect made her crust, but frozen empanada shells are sold in most markets, Goya offers a variety or you can use a ring mold or small bowl to cut the shapes out of frozen pie crust. Whatever you use for the shells, it’s the filling in these little gems that charms me every time…I had two.
Ok, two and a half.
But I ran an extra ½ mile the next day to neutralize the consequences.
You can fill an empanada with anything..savory or sweet and more on sweet empanadas in a future post.
Architect’s Empanadas
(Adapted from a recipe from the blog “From Argentina, With Love”)
Ingredients
1 pound ground turkey
1 tablespoon butter
2 medium onions, sliced
1 1/2 tablespoons smoked paprika
2 teaspoons cumin
Salt and pepper to taste
Crushed red pepper to taste
6-8 green olives, sliced
2 hard-boiled eggs, sliced
12 empanada rounds
Water to seal edges
Directions
In a medium saucepan, heat the butter over medium-high heat. Add the sliced onions and saute until translucent. Add the turkey, salt and pepper to taste and cook until the turkey has cooked through. Add salt, pepper, paprika, cumin, and crushed red pepper and mix well.
Place a spoonful of the meat mixture on each round but to prevent oozing don’t fill to the edge. Top each meat pile with a slice of egg and a couple of olives (even some raisins or sliced figs would be nice and add texture and a tasty surprise). Slightly wet the edge of the pastry, fold in half and pinch the edges together with your fingers.
Deep fry in canola oil until golden brown.
Serve. Eat. Drool.
Empanadas can also be baked for 10 minutes at 425º. Glaze with a beaten egg and place on parchment paper before baking.
We had a field green salad with almonds and oranges served in the lovely traveling salad bowl and a wonderful bottle of red wine. For dessert, we had the most delicious cupcakes from Georgetown Cupcakes in Washington, DC (my Firm has an office there). Our cupcake choices...Red Velvet with a Cream Cheese Icing, Chocolate with a Chocolate Icing, and Chocolate Mocha with a Buttercream Icing. So good. The proceeds from the purchase of the cupcakes benefited the “Hope For Henry Foundation." The Foundation provides electronic gifts to children hospitalizd with life-threatening illnesses.
Tuesday, September 20, 2011
Mini Chocolate Chip Banana Bread
When I buy a bunch of bananas, there’s a part of me that secretly (ok…intentionally) hopes that they turn all spotted and sweet because then I'll have the perfect excuse to make banana bread. Even better when you can add chocolate chips you have on hand.
Youngest daughter left some items behind (i.e. her cell phone, heaven forbid)when she came home to attend a high school football game…remember, she was one of the Drum Majors for the band last year. Since I work about 20 minutes away from the University of Delaware, I offered to personally return her things and, what the hell, I’ll bake banana bread for her and her hall mates too. I made three mini loaves…I kept one, I gave oldest daughter one, and youngest daughter got the third.
She said it was delicious.
And her hall mates now love me.
More baked goods encouraged.
Banana Banana Bread
From allrecipes.com
INGREDIENTS:
2 cups all-purpose flour
1 teaspoon baking soda
1/4 teaspoon salt
1/2 cup butter 3/4 cup brown sugar
2 eggs, beaten
2 1/3 cups mashed overripe bananas
DIRECTIONS:
1. Preheat oven to 350 degrees F (175 degrees C). Lightly grease a 9x5 inch loaf pan.
2. In a large bowl, combine flour, baking soda and salt. In a separate bowl, cream together butter and brown sugar. Stir in eggs and mashed bananas until well blended. Stir banana mixture into flour mixture; stir just to moisten. Pour batter into prepared loaf pan.
3. Bake in preheated oven for 60 to 65 minutes, until a toothpick inserted into center of the loaf comes out clean. Let bread cool in pan for 10 minutes, then turn out onto a wire rack.
NOTE: I made mini loaves and baked for 40 minutes. I also added 1 cup of chocolate chips.
Sunday, September 18, 2011
Parklet
So, I’m listening to the radio driving to work a few weeks back and I hear a story on CBSPhilly about a “parklet.” A “parklet”…what’s that? A few days later I heard a similar story on WHYY, our local NPR station.
This must be investigated, thought she.
She being me.
Below are the links to the two news stories:
Parklet Story - CBS Philly
Parklet Story - NPR
I am now totally intrigued by this trendy inner-city enterprise.
Wikipedia defines a parklet as “a small urban park, often created by replacing several under-utilized parallel parking spots with a patio, planters, trees, benches, café tables with chairs, fountain(s), artwork, sculptures and/or bicycle parking. Parklets are designed to provide a public place for citizens to relax and enjoy the atmosphere of the city around them….” This particular project was a relatively inexpensive venture, about $10,000 and was funded by a local foundation.
One sunny day, I visited this parklet – kind of like a moveable porch – located at the corner of 43rd & Baltimore Avenue in West Philadelphia andI drag youngest daughter with me youngest daughter volunteers to come with me. All kinds of people were sitting about chatting, laughing enjoying a cup of coffee, reading the paper and doing leisurely weekend kind of things…a virtual hub of happy activity. These trendy shared spaces can also be found in other cities, such as San Francisco, Oakland and New York City.
I was thinking, however, that perhaps “porchlet” would be a more apropos name.
Just saying.
But I get the parklet nomenclature…transforming humdrum parking spaces into an enjoyable and pleasant place to gather, plant foliage, etc..
More Photos:
Look at the lovely row homes in the first photo…very Philadelphia. More on row homes later. I adore this city.
When it was time to head home from our little adventure, I turned the wrong way on a one way street. Youngest daughter quickly admonished me for my gaffe…I’ve been living in the burbs for too long.
This must be investigated, thought she.
She being me.
Below are the links to the two news stories:
Parklet Story - CBS Philly
Parklet Story - NPR
I am now totally intrigued by this trendy inner-city enterprise.
Wikipedia defines a parklet as “a small urban park, often created by replacing several under-utilized parallel parking spots with a patio, planters, trees, benches, café tables with chairs, fountain(s), artwork, sculptures and/or bicycle parking. Parklets are designed to provide a public place for citizens to relax and enjoy the atmosphere of the city around them….” This particular project was a relatively inexpensive venture, about $10,000 and was funded by a local foundation.
One sunny day, I visited this parklet – kind of like a moveable porch – located at the corner of 43rd & Baltimore Avenue in West Philadelphia and
I was thinking, however, that perhaps “porchlet” would be a more apropos name.
Just saying.
But I get the parklet nomenclature…transforming humdrum parking spaces into an enjoyable and pleasant place to gather, plant foliage, etc..
More Photos:
Look at the lovely row homes in the first photo…very Philadelphia. More on row homes later. I adore this city.
When it was time to head home from our little adventure, I turned the wrong way on a one way street. Youngest daughter quickly admonished me for my gaffe…I’ve been living in the burbs for too long.
Thursday, September 15, 2011
Patty Cake
We had dinner at Foodie's last night and she made Salmon Patties. I usually use regular bread crumbs when I coat stuff to pan fry or bake, but Foodie’s recipe called for panko bread crumbs, and because I like to know the “why” of things, I decided to explore and share what makes panko bread crumbs different regular bread crumbs.
Wikipedia explains that “panko (パン粉) is a variety of flaky bread crumb used in Japanese cuisine as a crunchy coating for fried foods. Panko is made from bread baked by passing an electric current through the dough, yielding bread without crusts, and it has a crisper, airier texture than most types of breading found in Western cuisine.”
But what makes panko bread crumbs different from regular bread crumbs…the answer is in the processing. Panko bread crumbs look like flakes or slivers of bread rather than their crumbly counterparts. Each panko flake or sliver covers more surface than a traditional crumb which results in a crispier, lighter coating. To me, panko kind of looks like coconut.
And these patties were light, crispy and delicious indeed! Perfect topped with the sauce.
SALMON PATTIES
1 1/2 pound fresh salmon - diced into small pieces
1/2 onion - grated
2 pieces of white bread (pepperidge farm) diced very small
2 tablespoons mayo
Lemon zest and juice from one lemon
Fresh parsley
Salt and pepper
Combine all of above, shape into patties and place in freezer on parchment lined sheet pan for 15 -30 minutes
Coating preparation
Beat 2 eggs with a little oil and water in flat dish
Put flour in another flat dish
Put panko bread crumbs in a third flat dish
Dip patties in flour, then egg, then panko. Fry in a mixture of olive oil and butter until golden and cooked through.
Sauce
Combine ½ cup of mayonnaise, ½ cup of sour cream, lime zest and juice, chopped cilantro and finely diced jalapeno to taste. Add salt and pepper or whatever else you want.
We also had a zesty green salad with almonds, pears and gorgonzola cheese served in the lovely traveling salad bowl and for dessert, fig and mango gelato with fresh berries. We were serenaded all evening by an assortment of artists while listening to a custom Pandora network channel. A lovely evening.
Foodie got a fantastic new refrigerator...a shiny white number from LG. She gave us a chilly tour of its features....very fancy.
Saturday, September 10, 2011
Rusty Wrap
So…I stop in to say hello to our Firm’s librarian and my daily greeting is momentarily commandeered. I am distracted by an absolutely spectacular wrap she is wearing and I immediately know that she knitted this lovely little lacey number. I, of course, gush about how beautiful it is and ask if I could take photos…she happily obliges (or humors me, I’m not sure which).
Anyway, here are a few photos of the wrap…
Here’s the link to the pattern Terra Triangular Shawl
Her email to me with the link included this note…”it took me two weekends. I've named it Irene since I cast on and did the majority of the work during the Irene weekend.”
She knitted, I cooked. I knitted as well but did not finish anything. Please suppress your surprise.
I often knit vicariously through my more gifted (and speedy) friends and co-workers.
Which explains this post.
Thursday, September 8, 2011
Vodka Penne
After a summer-long hiatus, our weekly dinners had resumed and we have a new member to our group….another girl from the hood who from this point forward will be referred to as "The Singer."
No initiation rituals, just a pledge to feed us every 4th week.
I inaugurated this season of culinary adventures with my Vodka Penne. I usually make this using sub-standard Vodka, but over the summer I ran out of the cheap stuff and had to make this recipe using Grey Goose and I could not believe the difference in the taste of this house specialty. Needless to say, I will never, never, ever use cheap vodka again.
Isn’t that last sentence a double-negative?
Sister Carmella would be annoyed.
Being a curious sort, I asked myself what distinguishes premium Vodkas like Grey Goose, Ketel One, or Absolut from their less desirable counterparts. Apparently, different vodka tastes are influenced by the grain used, the number of times the grain is distilled, and the type of water used to dilute the grain after distillation. Grey Goose, for example, boasts that its Vodka is distilled from “French wheat and is made with spring water from Gensac that is naturally filtered through champagne limestone.”
Alrighty then.
My Vodka Penne recipe:
Sauté several cloves of garlic, a ¾ teaspoon of sea salt, and ¼ to ½ teaspoon of red pepper flakes (depending on how spicy you like it) in 3 tablespoons of olive oil for about 3 minutes. Add a can of San Marzano crushed tomatoes and let that mixture simmer for 20-25 minutes.
Meanwhile cook your penne pasta….I like to use whole wheat pasta. After the sauce has simmered for 20-25 minutes, add the pasta, toss.
Add 1/3 cup of vodka, toss.
Then add ½ to 1 cup of Half & Half (depending on how creamy you like it), toss.
Sprinkle with 2 tablespoons of chopped parsley and serve. I added grilled chicken as well.
We also had an arugula, grapefruit and goat cheese salad, the most beautiful – and I might add delicious – fig tart and two (yes, two) bottles of wine.
A delightful start to a new season of dinners.
Saturday, September 3, 2011
QR Codes...Say What?!
You may have noticed digitized crossword puzzle-looking blocks popping up everywhere that look like this:
They are called QR Codes and have been all the rage in Japan and Europe for quite some time and are now very popular in the United States. I created the one above for KnitOnePearlOnion. I used the site www.qrstuff.com to create the KoPo QR code and here are the simple steps to follow so you can create one too:
1. Go to the above site
2. From the radio button choices, select to what you’d like to assign a QR code…I selected “Website URL”
3. Type in the website URL
4. Download the code’s image!
To scan your newly created code, or any QR code, download a scanner app to your smart phone – I downloaded ATTScanner. The application will allow you to scan the image of your new QR code. You will be prompted with the question “Do you want to open this web page?’ say “YES” and off you go on a cyber reference extravaganza....or at least to your website.
The website www.grstuff.com explains that “a QR Code can also contain a phone number, an SMS message, V-Card data (which is an electronic business card) or just plain alphanumeric text, and the scanning device will respond by opening up the correct application to handle the encoded data appropriately…”
These patterns might make snazzy table linens.
I’ve seen QR codes used in museums, restaurants, retail stores and just about anywhere a third party wants to encourage a visitor to download instant information about a product or service. For instance, let’s say you see a painting in a museum or gallery and you’d like to learn a bit more about the theme of the piece, the artist and his/her work. You notice that there’s a QR code on the little white card next to the painting. Just scan the code with your smart phone and the information appears right on your phone! For purposes of this illustration, I’ll use a painting I have in my home.
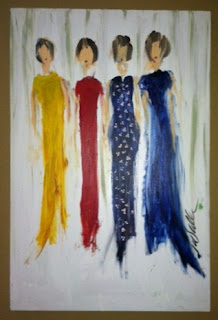
Here’s the painting called “Four Lovelies”
Here’s the QR code that tells you a little bit about the painting and it’s artist.
How cool is that?!
This is what that crazy patterns says:
This fanciful and vibrant painting was commissioned by the owner and is called “Four Lovelies.” The figures represent the owner, her two daughters and her sister. It was painted by Lambertville, NJ artist, Tony LaSalle, who’s joyful and passionate paintings -- using acrylic on canvas – include small portraits, people and massive bountiful gardens, many of which were inspired by the Tuscan countryside. Dr. La Salle's work has been exhibited at many local venues including Haverford School, Main Line Arts Center, and Delaware Valley College and Le Bus in Manayunk where the owner of this painting first saw his beautiful work.
Thanks to my friend Jenn S. for explaining all this to me!